Monday, October 1, 2012

Winner Winner Chicken Dinner!


Congrats Terra!  My cutie patootie little helper just drew your name for the Toxic Treats Stamp Set!  I'll be putting it in the mail at least by Wed.!  Hoping you are enjoying all the goodies you ordered!!!

Saturday, September 29, 2012

Holiday Cover Ornament

 
Here is my version of the ornament on the Holiday Catalog cover.  It actually is super easy to make!  It just takes a little time because you need 20 of each ornament but it comes together quickly.  I  "stood up" my red ornaments a little too high and didn't leave room for my rosette in the middle.  I'm going to remember that next time.  Stampin Up has a wonderful discounted bundle that includes the stamp set and the framelits you need to easily cut these ornaments out.  LOVE not having to cut by hand!  I could NEVER cut these so neatly by hand anyway!  You can get the clear mount bundle here and the wood mount bundle here!  Buying it in the bundle vs. separately saves you about 15%!!!  Plus don't forget the free spool of ribbon promotion that ends on Sunday!  You get your choice of a free spool of in color stitched satin ribbon with every $40 you spend!


Saturday, September 22, 2012

Frankie Treat Bag


My daughter and I had so much fun last night making these super cute treat bags that the uber talented Chic N Scratch showed a while back.  You can see her awesome tutorial here.  This top note die is certainly versatile....love all the fun things you can do with it!  This project was super easy and super quick....just need the top note die and 2 different size circle punches (I used the 1" and the 3/4") and some cardstock and you are really good to go.  The "hair" I just free handed....super easy!  The eyelids and nose are just the 1" circle cut in half and inked around the edges.  I think Frankie is quite cute!  LOL!  Hope you will give making one of these a try!  I'm thinking a cute reindeer maybe for Christmas!

Thursday, September 20, 2012

Ghoulish Googlies Treats


Just got the rest of my Ghoulish Googlies Bundle yesterday and can you say FUN!!!!!  My 4 year old daughter and I had so much fun playing with this kit.  She even woke up this morning asking for more "googlie eyes".  There will definitely be some more of those on my next order and they work so beautifully with this Googly Ghouls stamp set.  For just $16.95 (minus 20% if you take advantage of my personal sale and order now....details in post below)....you get the stamp set AND the whole designer kit which comes with these super cute little glassine bags that are SOOOO cute embossed!!!!!  You also get 2 sheets of the diecuts you see as my tags in the projects I made plus a package of googlie eyes and coordinating baker's twine!!!  These googlie eyes are adhesive backed so they are so easy to adhere to your project!  You can see I went a little crazy with them!  So cute for little gifts!  You can see the 3 Musketeers through the bag in the photo above.  I put 3 of the little snack size ones in there and it filled the bag nicely.

Wednesday, September 19, 2012

Bat Treat Topper

 
I spend too much time on pinterest but it so full of amazing ideas and it is wonderful to have them all in one place!  Anywho....I saw this on there and had to try one.  I already had my top note die out from my last project...see below....so I was ready to go.  This is so super quick and easy!  I didn't have the super large circle punch so I used a spellbinder framelit I had already for my "moon" and then the bird builder punch to get my branch.  The bat is just the owl from the owl punch turned upside down.  His wings are the vest from the punch just turned on their side.  I again used the very vanilla craft ink to sponge around the edges to make the black pop a little.  I just realized as I'm typing this that I need to add a mouth to my owl....LOL!  I'll do that with a silver marker when I find one.  Hope you try this project as it was alot of fun to put together and comes together super fast!  Again...something you could easily mass produce.  If you don't already have this punch....I'd love to help you out.  Plus I'm having a 20% off sale....you can see the details in the post below. 

Tuesday, September 18, 2012

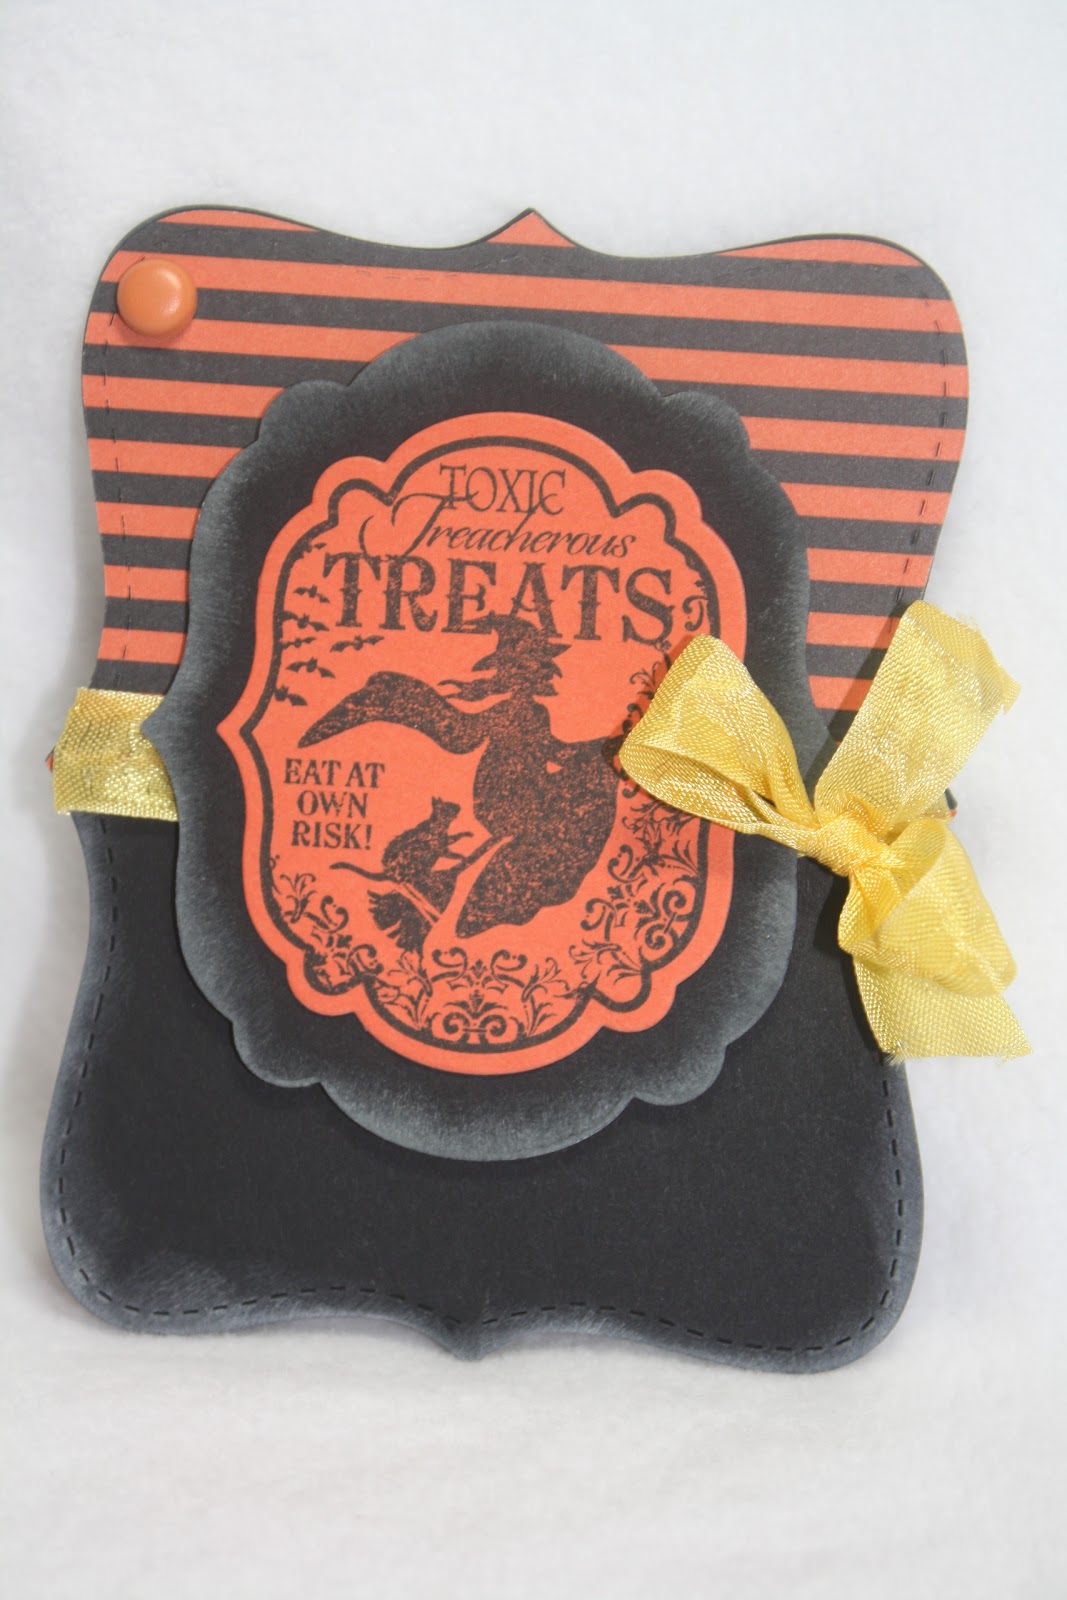
Toxic Treats Gift Card Holder

 
I LOVE pinterest.  I was looking around there tonight and saw a super cute gift card holder here.  I decided to make a Halloween version....I used the super cute stamp set again called Toxic Treats.  Don't forget if you place an order with me before the end of the month you will get your name placed once for every $40 spent in a drawing for this awesome stamp set.  I'll be drawing October 1st so you will have plenty of time to make those super cute Halloween projects!  If you order by this weekend I'll give you 20% off your order before shipping and tax.  AND.....don't forget the Stampin Up special this month of a free spool of in color stitched satin ribbon with every $40 you spend.  Here is the inside of the card:
 
 
I used the top note die....that die is so amazingly versatile!  I cut three of them.  Two out of the basic black cardstock and one out of the super cute Howlstooth and Scaringbone Designer Series Paper.  I cut the DSP one in half to use 1/2 on the top of one top note die cut and the other on the bottom half of the second die cut....note to self only put adhesive around the three edges of the second one....ask me why I'm pointing that out....LOL!  Decorate and add a brad to make the top "swing" and you are good to go.  By the way that super cute image was cut out using the Labels Collections framelits .... if my memory serves me it was the smallest one and then I used the next size up to make a mat for it.  To make the black stand out a little more I sponged some Very Vanilla craft ink around the edges.  Really cute and super easy to mass produce!  Hope you enjoyed this project!  Happy Crafting!


Monday, September 17, 2012

Two Tags Gift Card Holder

 
I needed to make something super quick tonight to give to my daughter's ballet teacher in the morning as the facility we've been taking lessons at is closing.  I wanted something to dress up a gift card and the Two Tags die is perfect for that!  I found this double sided paper in my stash and I just used one side up for the die and the other to make a little wrap for it to slide in to.  I used the Delicate Doilies die as a background for my rosette.  My Thank You sentiment comes from the Itty Bitty Banners stamp set and I cut it out with the coordinating Bitty Banners Framelits.   Here is another picture showing the individual pieces:
 
 
This die cuts the little flap to slide the gift card in so all I had to do was insert my gift card and add some baker's twine.  I know I'll be using this die quite often with the holidays coming up so fast!  Super quick and easy project!


Thursday, September 13, 2012

Halloween Printer's Tray

 
Yeah!  I got my printer's tray project kit in the mail!  I had so much fun putting it together last night! All I need to do is get a cute photo of the kids to add to that open block!  I was putting together an order of goodies for my Mom for her birthday and it dawned on me why not gift her a demo kit!  She ended up getting even more goodies and I got a great price for them along with free shipping right to her home PLUS we both got a free printer's tray project kit!  SWEET!!  This special promotion ends Sept. 16 so if you have ever thought of signing up or if you just want to take advantage of an awesome deal now is the time!!!  You get to choose $125 worth of Stampin Up products for only $99 plus you get free shipping AND if you sign up before the Sept. 16th deadline you will get a printer's tray kit for FREE!  This kit comes with everything you need to make this project except the ink.  You will LOVE it!!!  The toxic treats stamp set is included as well as the papers, adhesive, ribbon, buttons, super cool glittery web die cut, rhinestones and baker's twine you will need to put this together plus you will have left overs!!!  Even if you just want to sign up for the discount....you can sign up now and enjoy the discount through December plus if your first order is $150 or more you will get an extra 10% discount in addition to the demonstrator's regular discount! It's super easy to sign up and you can do it online even right here.  If you have any questions, please don't hesitate to email me....the link is on my sidebar....and I'll be glad to answer them.  I check my email several times daily so I'll be super quick to get back to you.   Here's another view of this super cute project that was so easy to put together and so much fun!!!  I can't wait to my friends come over and I can say "why yes I did make that"...LOL!


Wednesday, September 12, 2012

Halloween Treats & A Super Treat for You

 
I can't say that I'm a big fan of halloween but I do love the decorations!  I was playing around with some ideas for my daughter's gifts to classmates this year and this is what I came up with.  I used the super cute and versatile hostess set out of the holiday catalog called Mixed Medley for the spider web and the Treats for Boo!  What an awesome set for $10 hostess dollars!  The minimum order for a "party" which wins you $25 in hostess dollars is only $150.....and you can choose to spend those dollars on anything you want, however, the specially priced hostess sets can only be purchased with hostess dollars.  So why not grab a friend and put together your order of $150 or more and you could both get this stamp set for free!  I'm working really hard to reach a goal by Sept. 15th so I'm offering my blogger friends a 20% discount on your orders from now until the 15th!  PLUS Stampin Up has their special going on with a free spool of in color stitched satin ribbon of your choice with every $40 you spend so for instance $160 would earn you 4 spools of ribbon!  PLUS....I will be putting your name in a drawing for the super cute Toxic Treats stamp set once for every $40 you spend with me.  I'll be drawing a winner on October 1st for that! 
 
Here is a close up of the little toppers!  The smallest circle (Treats for Boo) was punched out with the 3/4" circle punch and the spider web was punched with the new 1 and 1/4" scallop punch in the new holiday catalog.  The black was punched with the 1 and 3/4" scallop punch.....love how they layer up!  By the way those are candy corn M&Ms.....can you say yummy!


Saturday, September 1, 2012

Back to Spool Promotion

 
WOW!!!! Stampin Up is running an awesome promotion for the month of September!!!  For every $40 you spend on stampin up products you get to choose your favorite spool of stitched in color ribbon for FREE!!!!  So I know you are loving the new holiday catalog and have been busy making your wish list and checking it twice....so why not go ahead and place that order now while you can get an AMAZING extra!!!  This special offer makes those amazing stamps/framelit discounted combos even sweeter!!!  PLUS......I'm going to sweeten this promotion even more! I've been having so much fun with Stampin Up and am coming up on my 6 month anniversary....I know....I can't believe it has already been half of a year!  I'm very close to a promotion and I would love it if you would help me reach my goal this month!  I have an extra Toxic Treats stamp set coming my way with my most recent order and I'm going to give it away!  All you have to do to be entered in my drawing is to place an order through my Stampin Up website (there is a link on my sidebar to take you directly there) or you can just email me directly and I'll place your order for you.  I will place your name in my drawing one time for every $40 you spend!  I will draw a winner on October 1st so the winner will still have plenty of time to use it for this year's Halloween projects!


Stampin Up has also extended the amazing new demonstrator promotion until September 16 so if you have been considering joining Stampin Up this is just another great reason to do it now!  You can sign up here or email me if you have any questions at all! 


Monday, August 27, 2012

Toxic Treats Tag


I had so much fun playing with the Toxic Treats stamp set from the new holiday catalog this weekend.  I used the Two Tags die again and the sentiment is from Teeny Tiny Wishes.  Only a few days left if you want to take advantage of the awesome new demonstrator promotion and get the awesome printer's tray kit along with your $125 worth of product for only $99 and free shipping!!!  Don't forget you can now choose whatever product you want in your kit!  Plus you will get your business essentials like catalogs and order forms, etc. included in that kit for free!  What's not to LOVE about that?!   Just a reminder of what that AWESOME kit looks like:
 
 
This promotion ends the end of August.  If you have any questions at all, please feel free to contact me and I'll be glad to help.  You can sign up right on my website here or email me and I'll be glad to help you through that process.  


Saturday, August 25, 2012

 
I saw a super cute card made in this order on pinterest....here.  I love the simplicity of it!  Living in a military community we get new neighbors all the time so I really needed to make some "welcome to the neighborhood" type cards and this is what I came up with.   I used Field Flowers on Crumb Cake cardstock with Gumball Green ink for the stems and a retired color I think it was called Really Rust for my blooms and the welcome banner.  I really want some Tangerine Tango to make this card again as I think that would really make the blooms "pop".  That sweet little Welcome banner was made using Fabulous Phrases and then cut out with the new Bitty Banners Framelits

Monday, August 20, 2012

Christmas Tags


I was so happy to finally get some "play" time in my craft room this weekend.  I came up with a couple of tags I hope you will enjoy.  I'm so loving this new Ornament Keepsakes bundle which I used on the "to my friend" tag....that phrase comes from the Friendly Phrases stamp set.  The For You tag gets its sentiment from the Itty Bitty Banners stamp set and I used the coordinating Bitty Banners Framelits to cut it out.  The sweet "merry" tag was made using the Tiny Tags stamp set with the coordinating Jewelry Tag Punch.  That cute Christmas tree was made so quickly and easily by using the Pennant Punch....I just punched out 4 pennants, scored down the middle of each one and then adhered them back to back.  That cute polka dot paper comes from the designer series paper Be Of Good Cheer...so cute!!!  Oh and I almost forgot.....both of the tags are actually the same diecut....one is just folded up and I used the awesome Two Tags Bigz Die for that!

Thursday, August 9, 2012

Ornament Keepsakes...old ink pad vs. new ink pad


Just had a few minutes to play today between picking up kids, etc. and I couldn't wait to play with the new Ornament Keepsakes and the new coordinating Framelits.  You can purchase them separately, however, you can buy them in a bundle and save some money!   Check the bundle out here!  Love how easy these are to work with!  I stamped my image first and then just laid the framelit on top of the image (notice it is called a framelit because it frames the image....you can see through it to line up your image) and ran it through my big shot....didn't have to tape it in place or anything which is nice if you are mass producing!  I knew I loved the new Stampin Up foam ink pads but I hadn't really compared the resulting images side by side and I decided to do that today.  On the left I used an old style Ruby Red pad I had...granted it is a little older but it seemed quite juicy and on the right is the new style pad in Raspberry Ripple.  Keep in mind that the Raspberry Ripple is a much darker almost jewel tone red but you can clearly see how much cleaner and crisper the new ink pads stamp!  Love it!!!  I actually had inked the Ruby Red up quite a few times....really did the twist, pat, twist, pat thing but with the Raspberry Ripple it was just a quick tap tap and onto the paper and this is the first result I got.  Just wanted to share this with you if you have been on the fence about trying the new ink pad.